Managing Goals for a Client
Goals are the clockwork of Goalify Professional - everything revolves around your clients' goals. Unlike the workings of a clock, we made sure that it is really easy to create and manage goals. This document will give you the ins and outs of managing goals for a client.
Creating a New Goal
Quick Setup Tutorial
- Go to your team's Members menu
- Select your client
- Choose the Add Goal option using the Action button
- Define the goal
To create a new goal for one of your clients, switch to the Members list of your team. Select the client you wish to create the goal for. With the main Action button, select the Add Goal option.
This will open the create goal window.
Understanding Goalify Goals
Creating a goal in Goalify Professional is easy, but we strongly suggest that you familiarize yourself with the key concepts that define a goal first. Read our Understanding Goalify Goals documentation to learn everything you need to know.
Step 1: Choose the Goal Type
First, you will have to select the type of goal. We made it easier to choose the correct goal type by providing some example applications. Or you create the goal by using one of the team's templates. To learn more about templates please read our Working with Templates guide.
Step 2: Adjust the Settings
Next, you will be presented with a list of different options that you can adjust to your liking.
- Name
The name of the goal, which is also shown to your client. Try to pick a short and descriptive name – long names might not be fully displayed on the Goalify mobile client.
- Description
This is used to describe the necessary action for this goal. We recommend to use the documents feature whenever possible as it provides many more options to provide important information for your clients.
- Auto-Coach
The Goalify platform has a powerful and smart reminder services that helps clients to stay on track with their goals. With auto-coach turned on clients will receive smart reminders when they start falling behind. Reminders are sent as push-notifications and for the auto-coach to work push-notifications have to be enabled for each device a client uses.
- Who can edit this goal
As a coach you can lock a goal so that a client cannot make changes to it.
- + Document
Attach documents to a goal for a client to review. You can learn more about the powerful feature by reading our documents guide
- Unit
The Unit option is only available for target amount and limit goals and describes the unit used to record activities for this goal. Together with the target amount, it helps your client to understand the purpose of the goal. A text-based unit might be miles, pages, liters, times.
You can also use a metric as the unit for a goal. When you use a metric as the unit, every activity recorded will automatically be added as a datapoint for the attached metric. You can attach any numeric metric as the unit for target amount goals. Task and avoid goals let you add a binary metric as unit.
- Start
This is the start date of the goal. You can set it to any date, even past and future dates. If you create a weekly or monthly goal, you will only be able to choose dates at the beginning of these periods. The start date of a goal cannot be changed after the goal has been created.
- Repeats every
This defines the period within which the goal needs to be achieved. If you need to create quarterly or even yearly goals, choose the custom option.
- Repeats variant
By default goals repeat every period, but you can set up the goal to only become active every second period, e.g. to not repeat daily but instead every other day.
Why use a metric as unit
A custom, text-based unit does not feature any analytics beyond the achievement level of the goal. A metric can be added to different goals, even across different clients, and provides you with more analytical options.
We suggest to use a metric whenever you have multiple clients working on similar goals. You can learn more about metrics by reading our guide on metrics.
Fixed Settings
While most settings can be adjusted even after the goal has been created, some cannot be changed. These settings are goal type, language, start and period length.
Step 3: Defining the Goal Target
You will only need to define a goal's target for target amount and limit goals. The target describes the specific amount of units that have to be reached to achieve the goal. Simply adjust the number in the respective field.
If you set a target, it will be applied to all subsequent periods as well. If you want to set different targets for future periods, use the Duplicate Below button to create a copy of the existing entry or the Add period button to create a new entry. By adjusting the Repetition field you can specify when this new target will be applied.
Setting Individual Targets for Different Days
For daily goals, you can even set a specific target for each day of the week. You can also choose to pause the goal on certain days. This will allow you to create daily goals that are only active Monday through Friday, for example, or only on weekends, or any other combination of days you need.
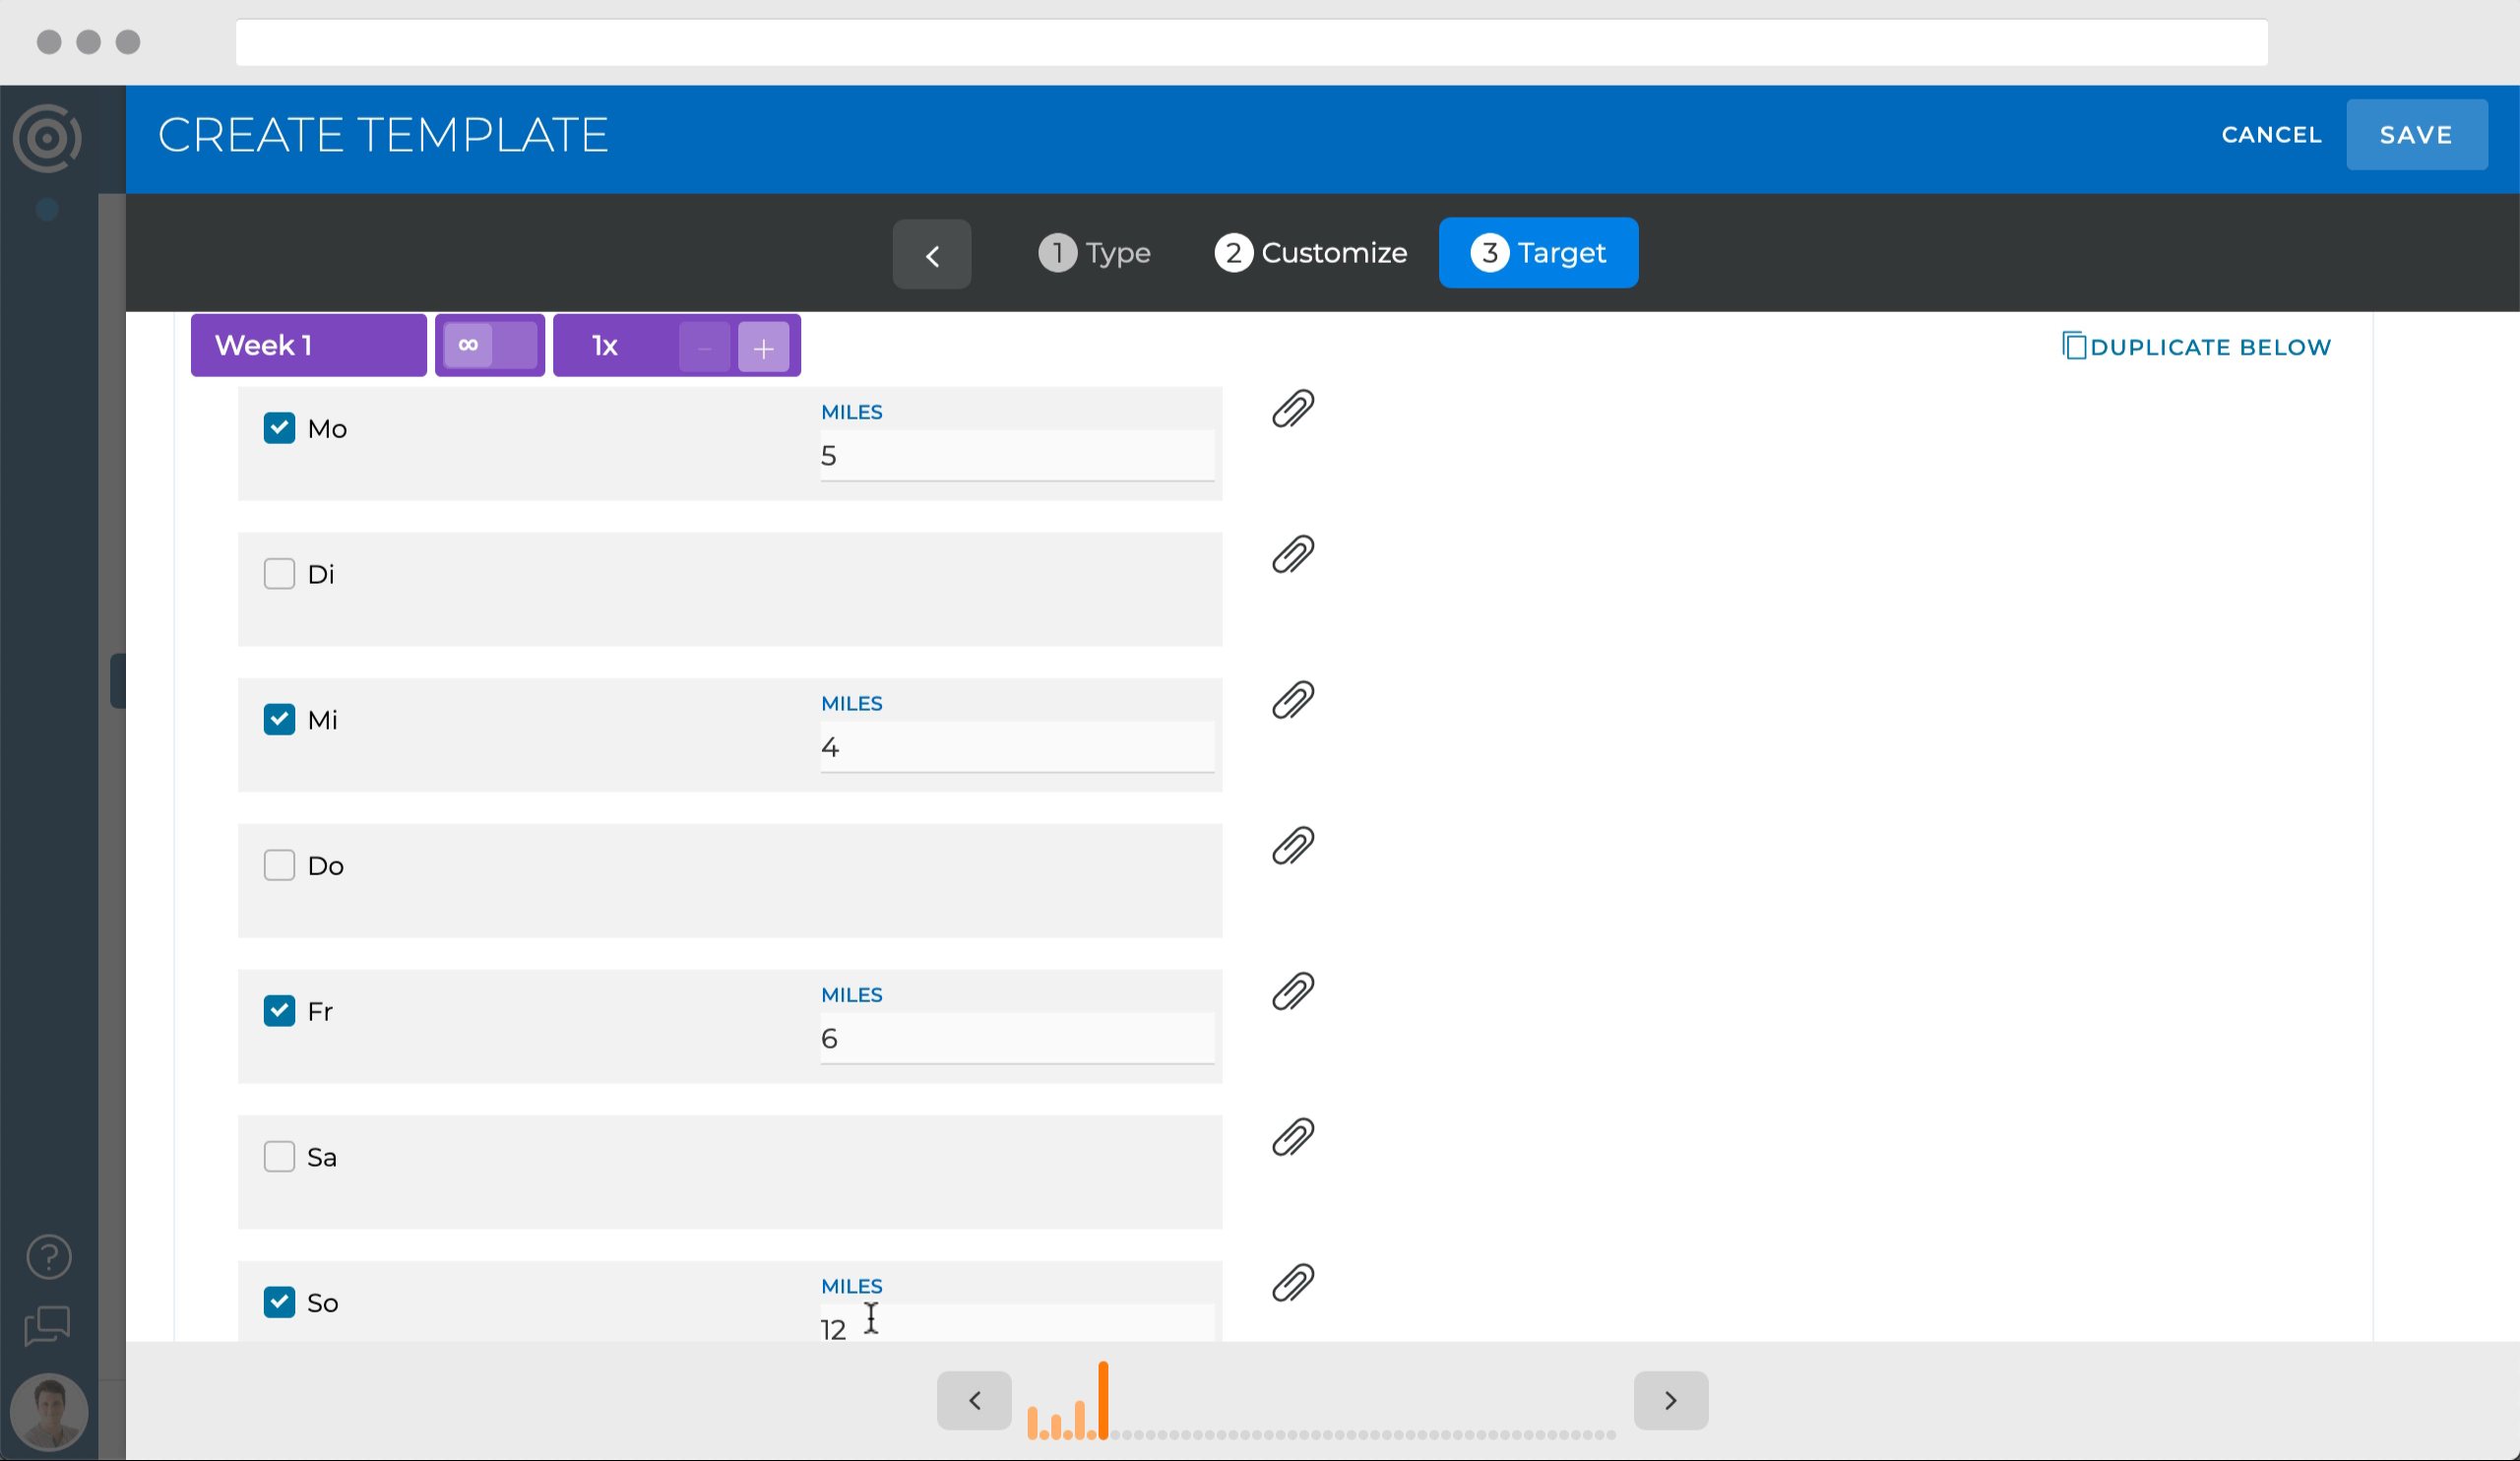
Pausing Periods
If you want to add rest periods for the goal, follow these steps:
- Create a new target entry
- Set the Starting with date field to the beginning of a paused period
- Uncheck the Target select box.
- Create another entry for the end of the paused period and adjust the target accordingly
By default, clients can input any number when recording an activity that counts towards the target amount. However, you may wish to predefine the amount clients can input with every recorded activity. Goalify Professional provides three options to choose from:
- Enter value for every recording
Clients can record any value for each activity they are recording. Example: a client should run 20 miles a week but may choose the length of each run individually. The client may record three runs, each with a value of 4 miles and one long run with 6 miles.
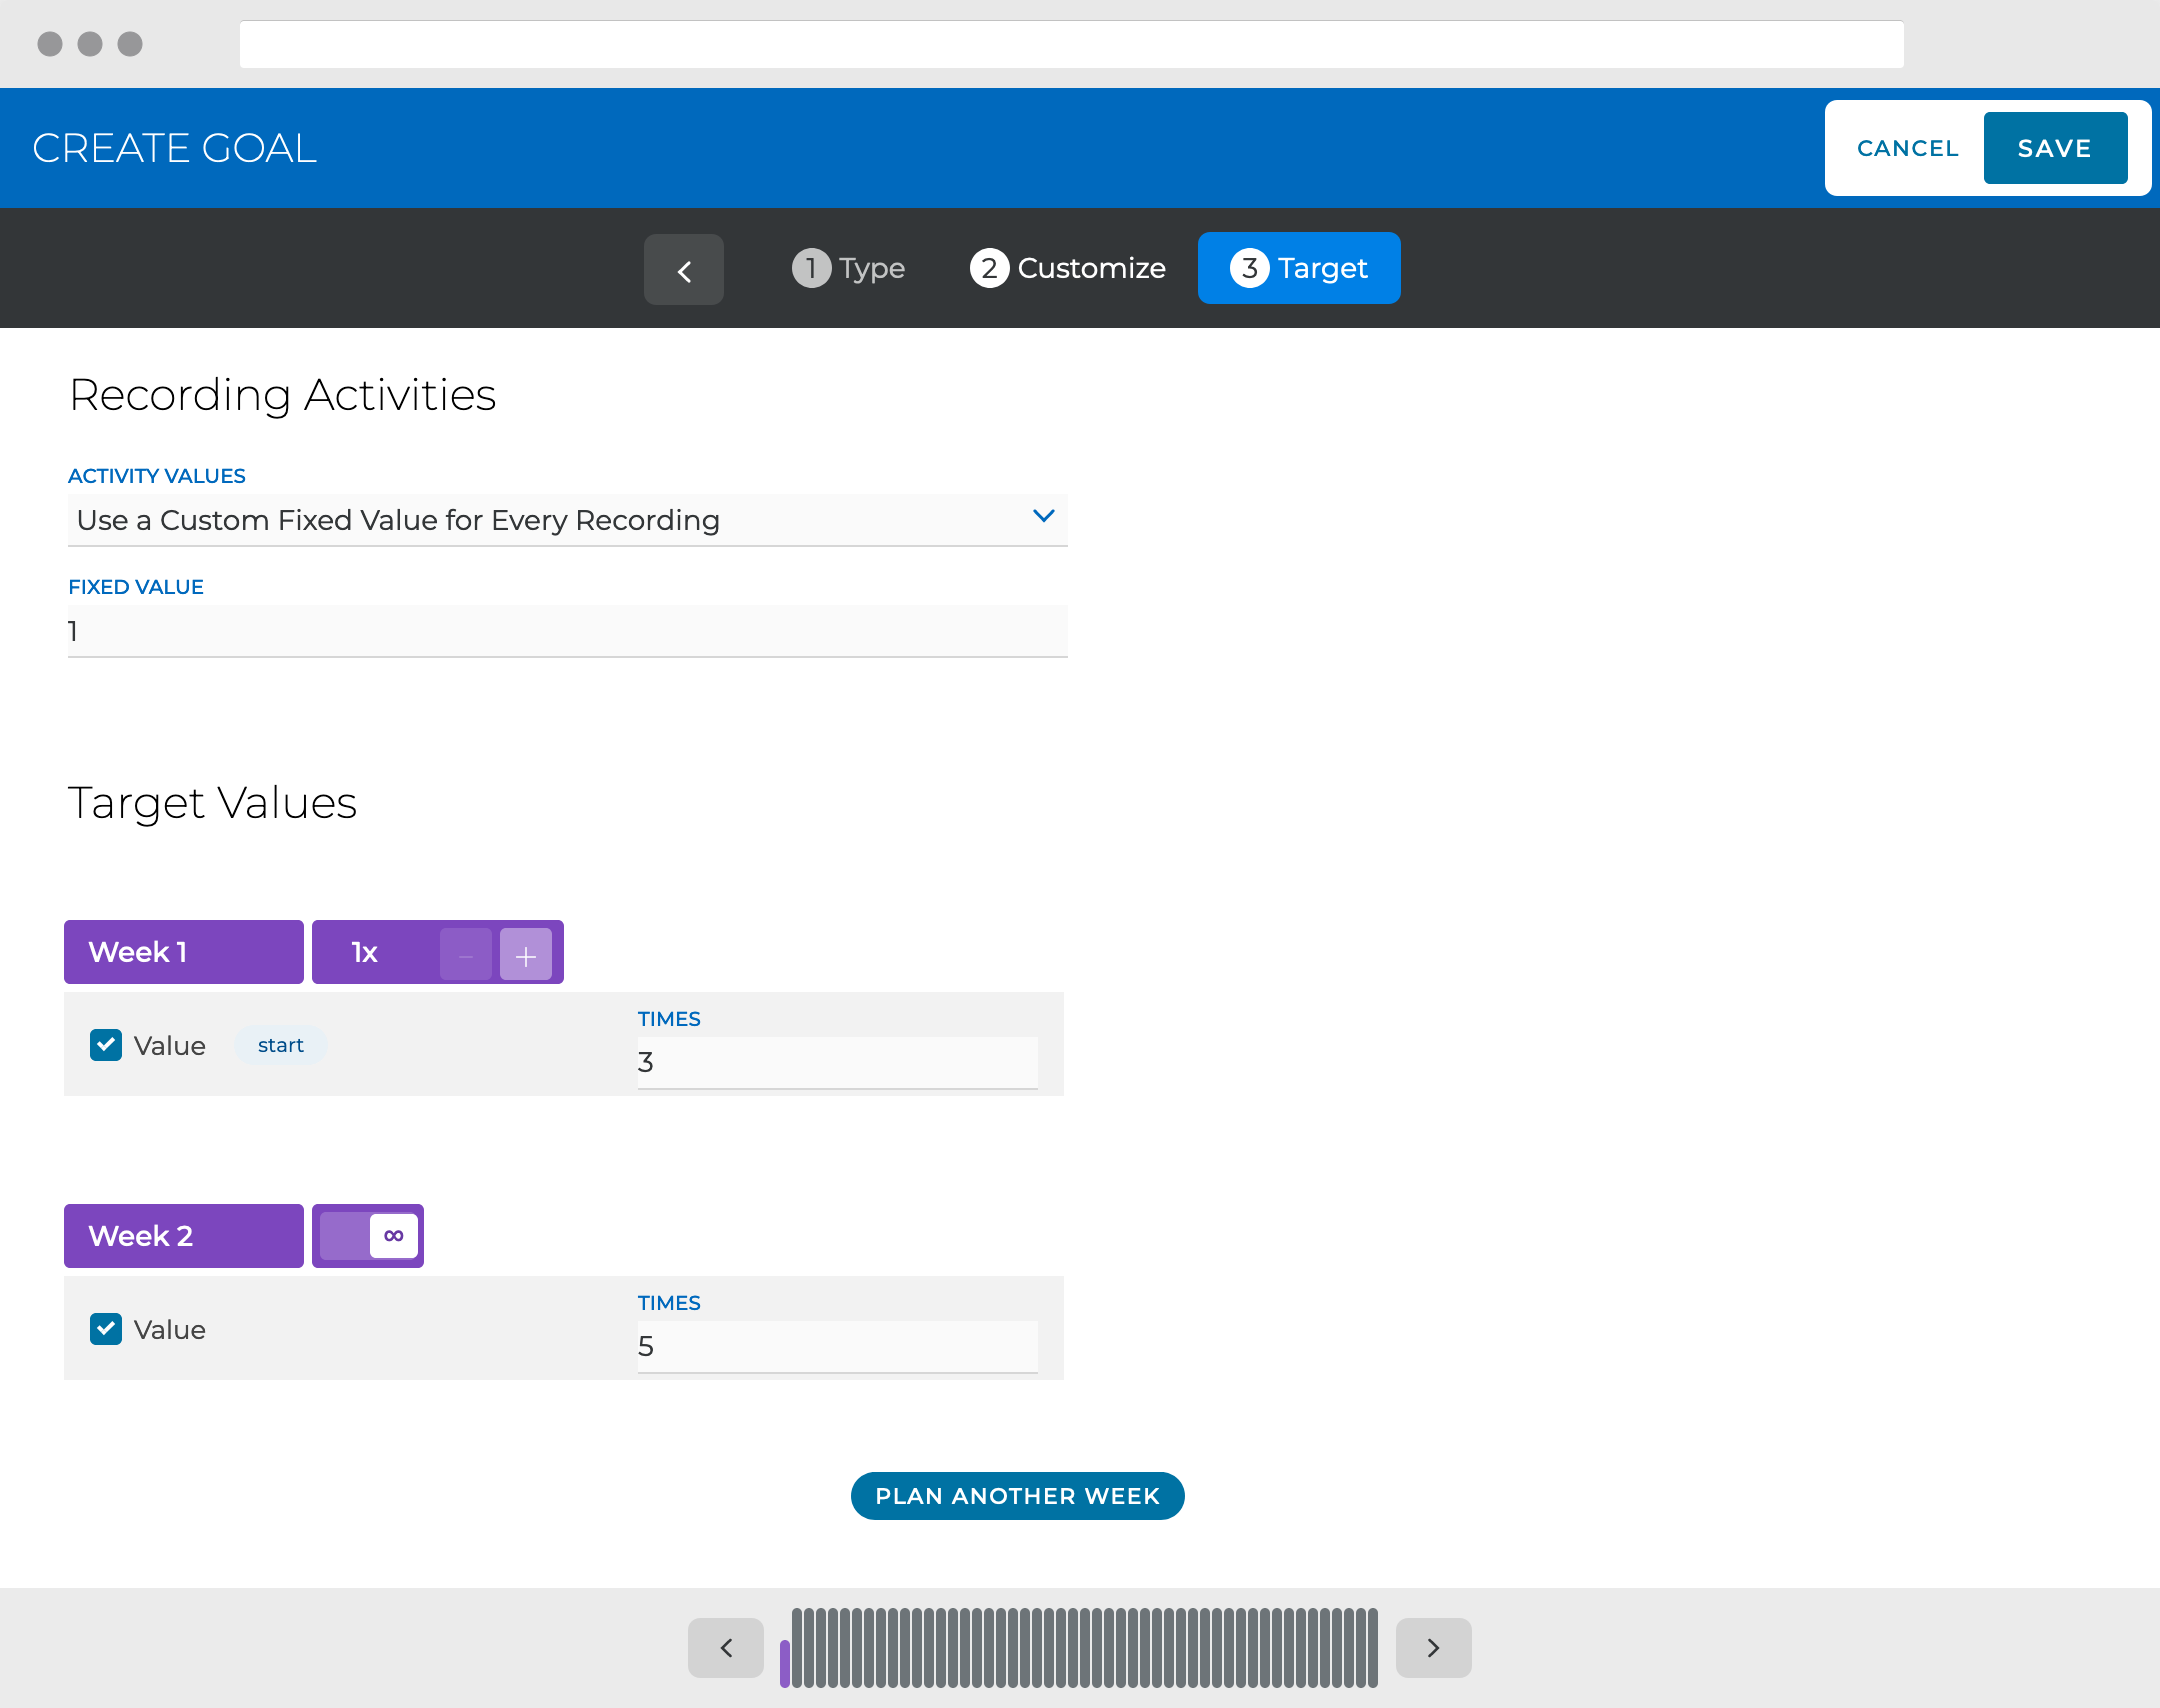
- Use a custom fixed value for every recording
The value for each recording is set by the coach. Example: a client should go for three runs a week. The coach set the fixed value to 1. This urges the client to record each run individually.
- Always use the current target and complete the goal
The value recorded is predefined by the actual target amount set by the goal for the current period. Example: a client should go running for 30 minutes on Monday, 40 Minutes on Wednesday and 60 Minutes on Saturday. Goalify mobile app will display these targets on the respective days and while the client will only need to tap the complete button as 30, 40 and 60 are automatically being recorded.
Step 4: Adding additional Metrics
Metrics that you add on the Additional Metrics screen of the goal creation wizard, are shown to the client when he/she records an activity for that goal. You can learn more about metrics by reading our metrics guide.
Quick Setup Tutorial
- Use the Add Metric button
- Select an existing metric or create a new one
- Mark the metric as optional or required
- Click the Add button
Use the blue Add Metric button on the Additional Metrics screen. With the Search Team Metrics search box you can select an already existing metric. Using the Create New Metric button you can configure a new metric and use it with the goal.
Required vs. Optional Metrics
By default, metrics are marked required and the client needs to respond to the metric when recording an activity. However, you can mark these additional metrics also as optional. Now the client can, but doesn't have to, respond to the metric when recording an activity.
Goal Drafts
When you create a new goal or template we will auto-save your work every few seconds as a draft, including all attached documents. You can also save your work on a goal or template as a draft to be completed and assigned at a later time.
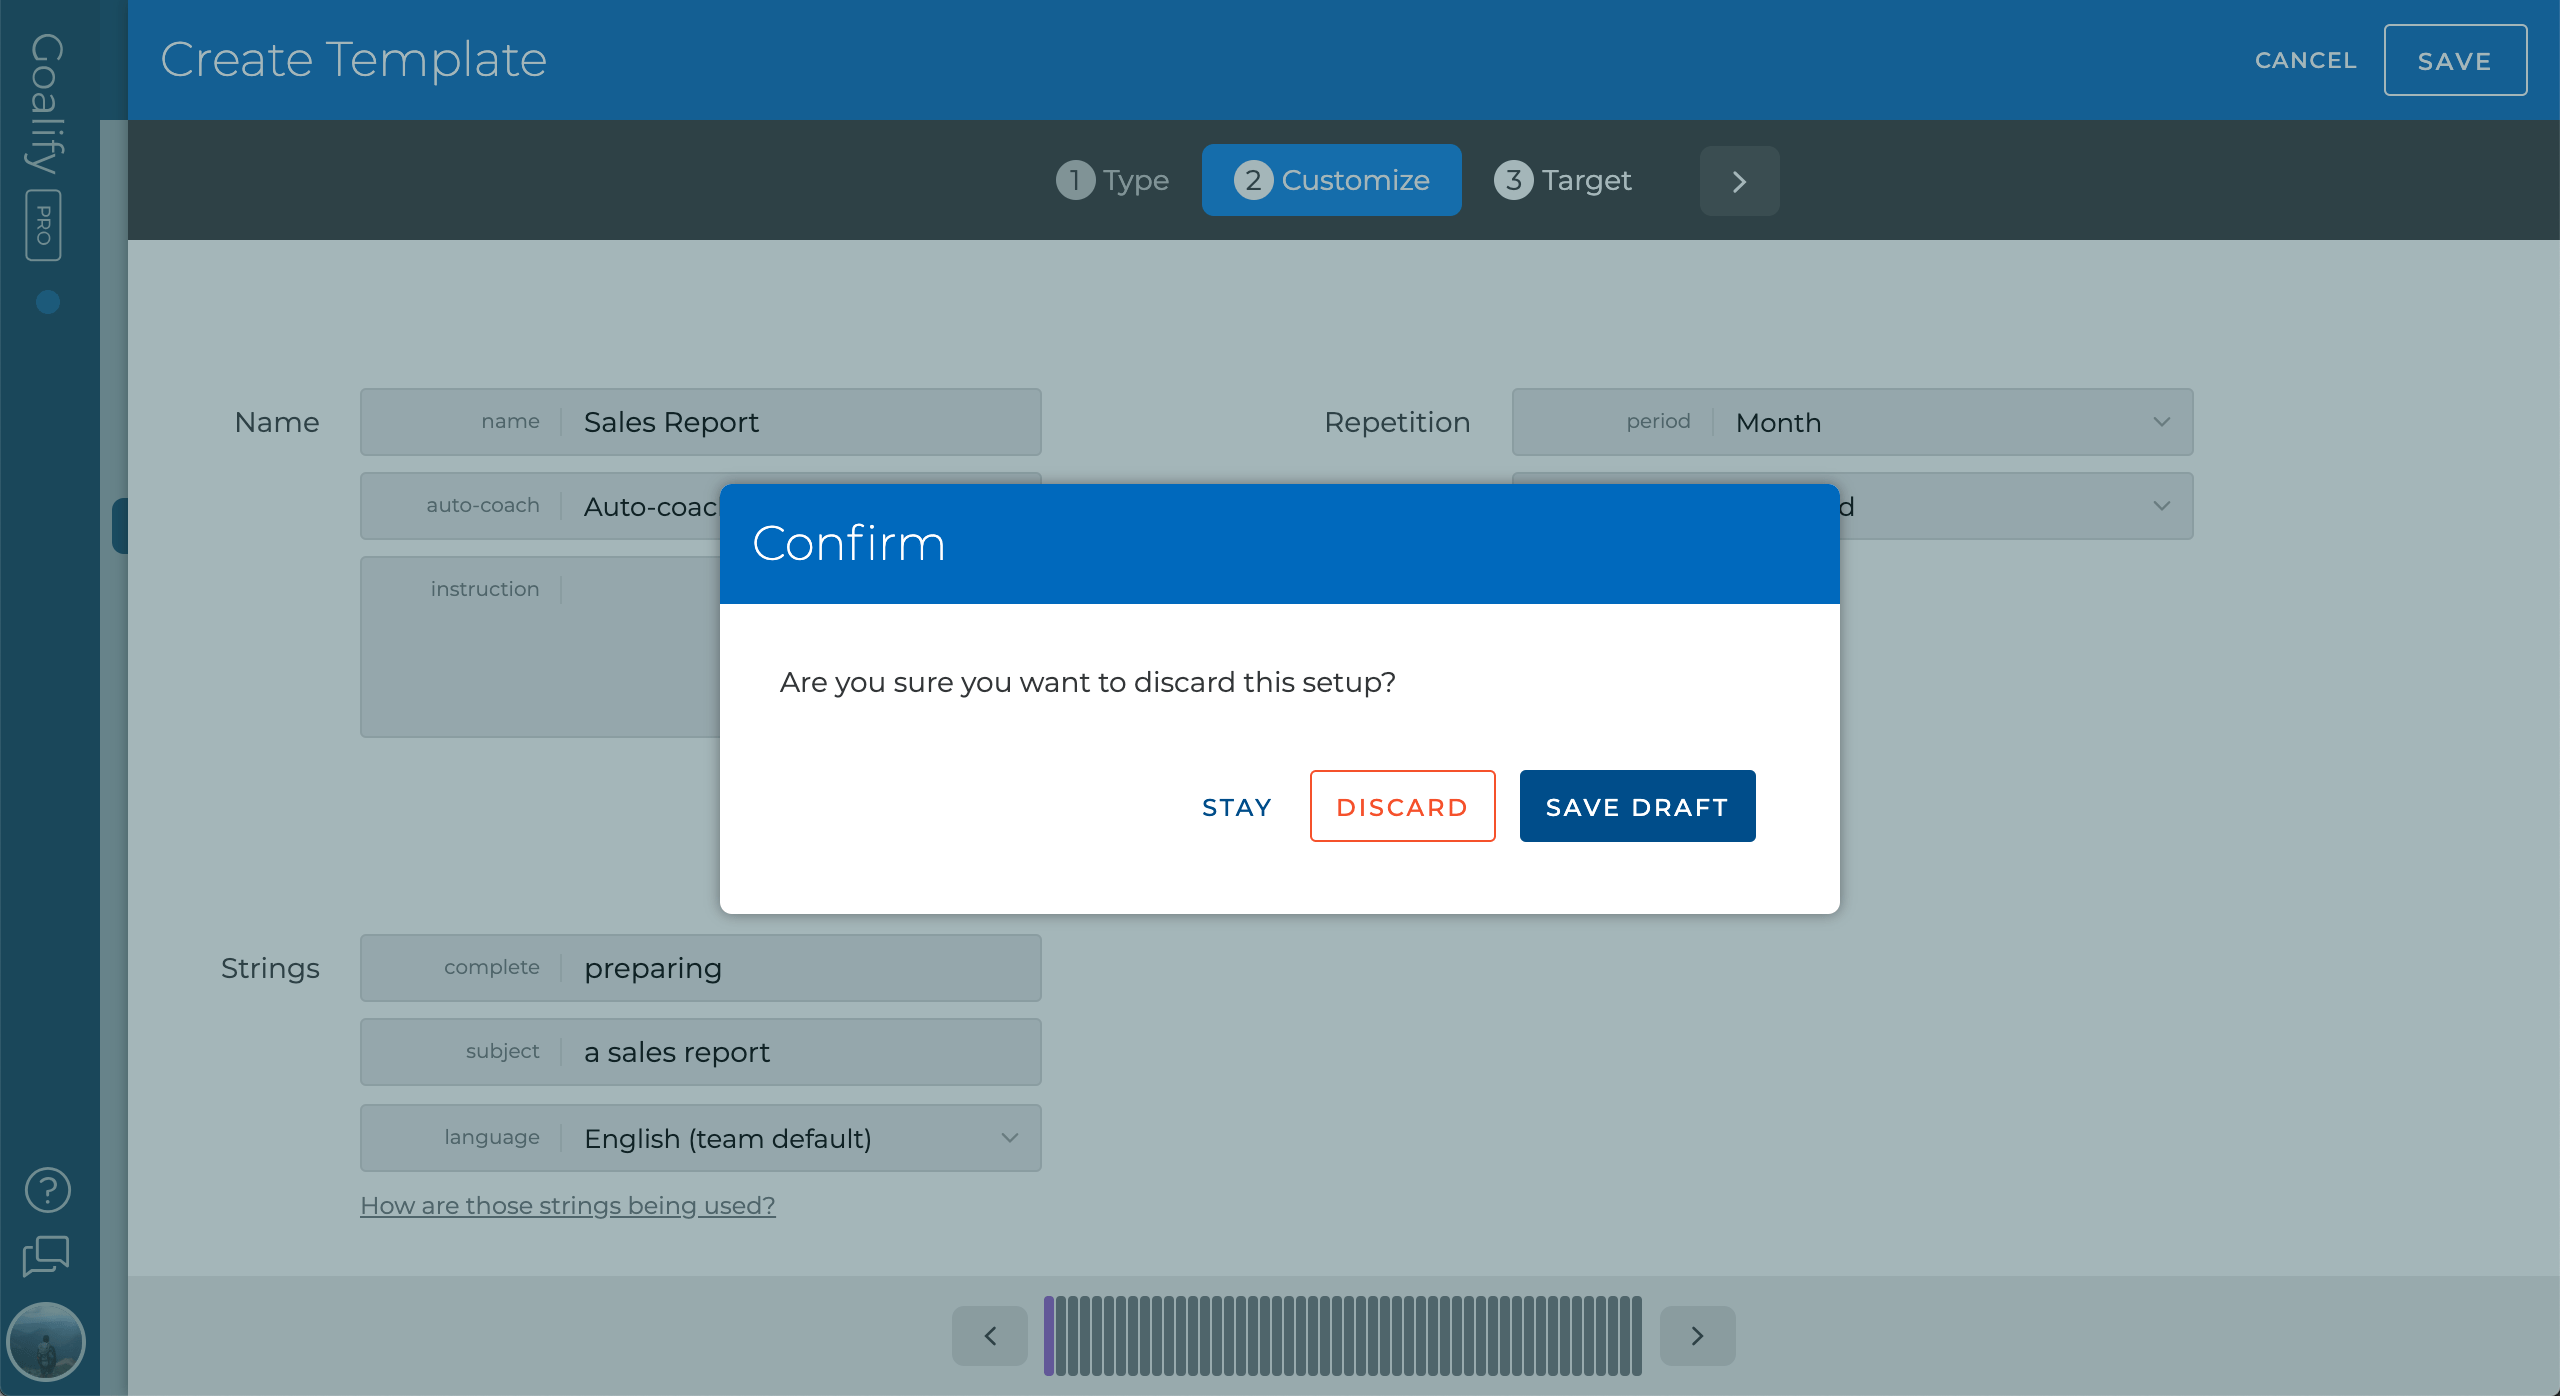
Manually Save Draft
You can also manually save your work as a draft when creating a new goal or template. Click the Cancel button on the top right and confirm your action by saving the current state as a draft. You will be able to pick up your work by simply restoring the draft at a later time.
Restoring a Draft
Simply start creating a new goal or template and choose the saved draft from the draft section of the goal creation wizard.
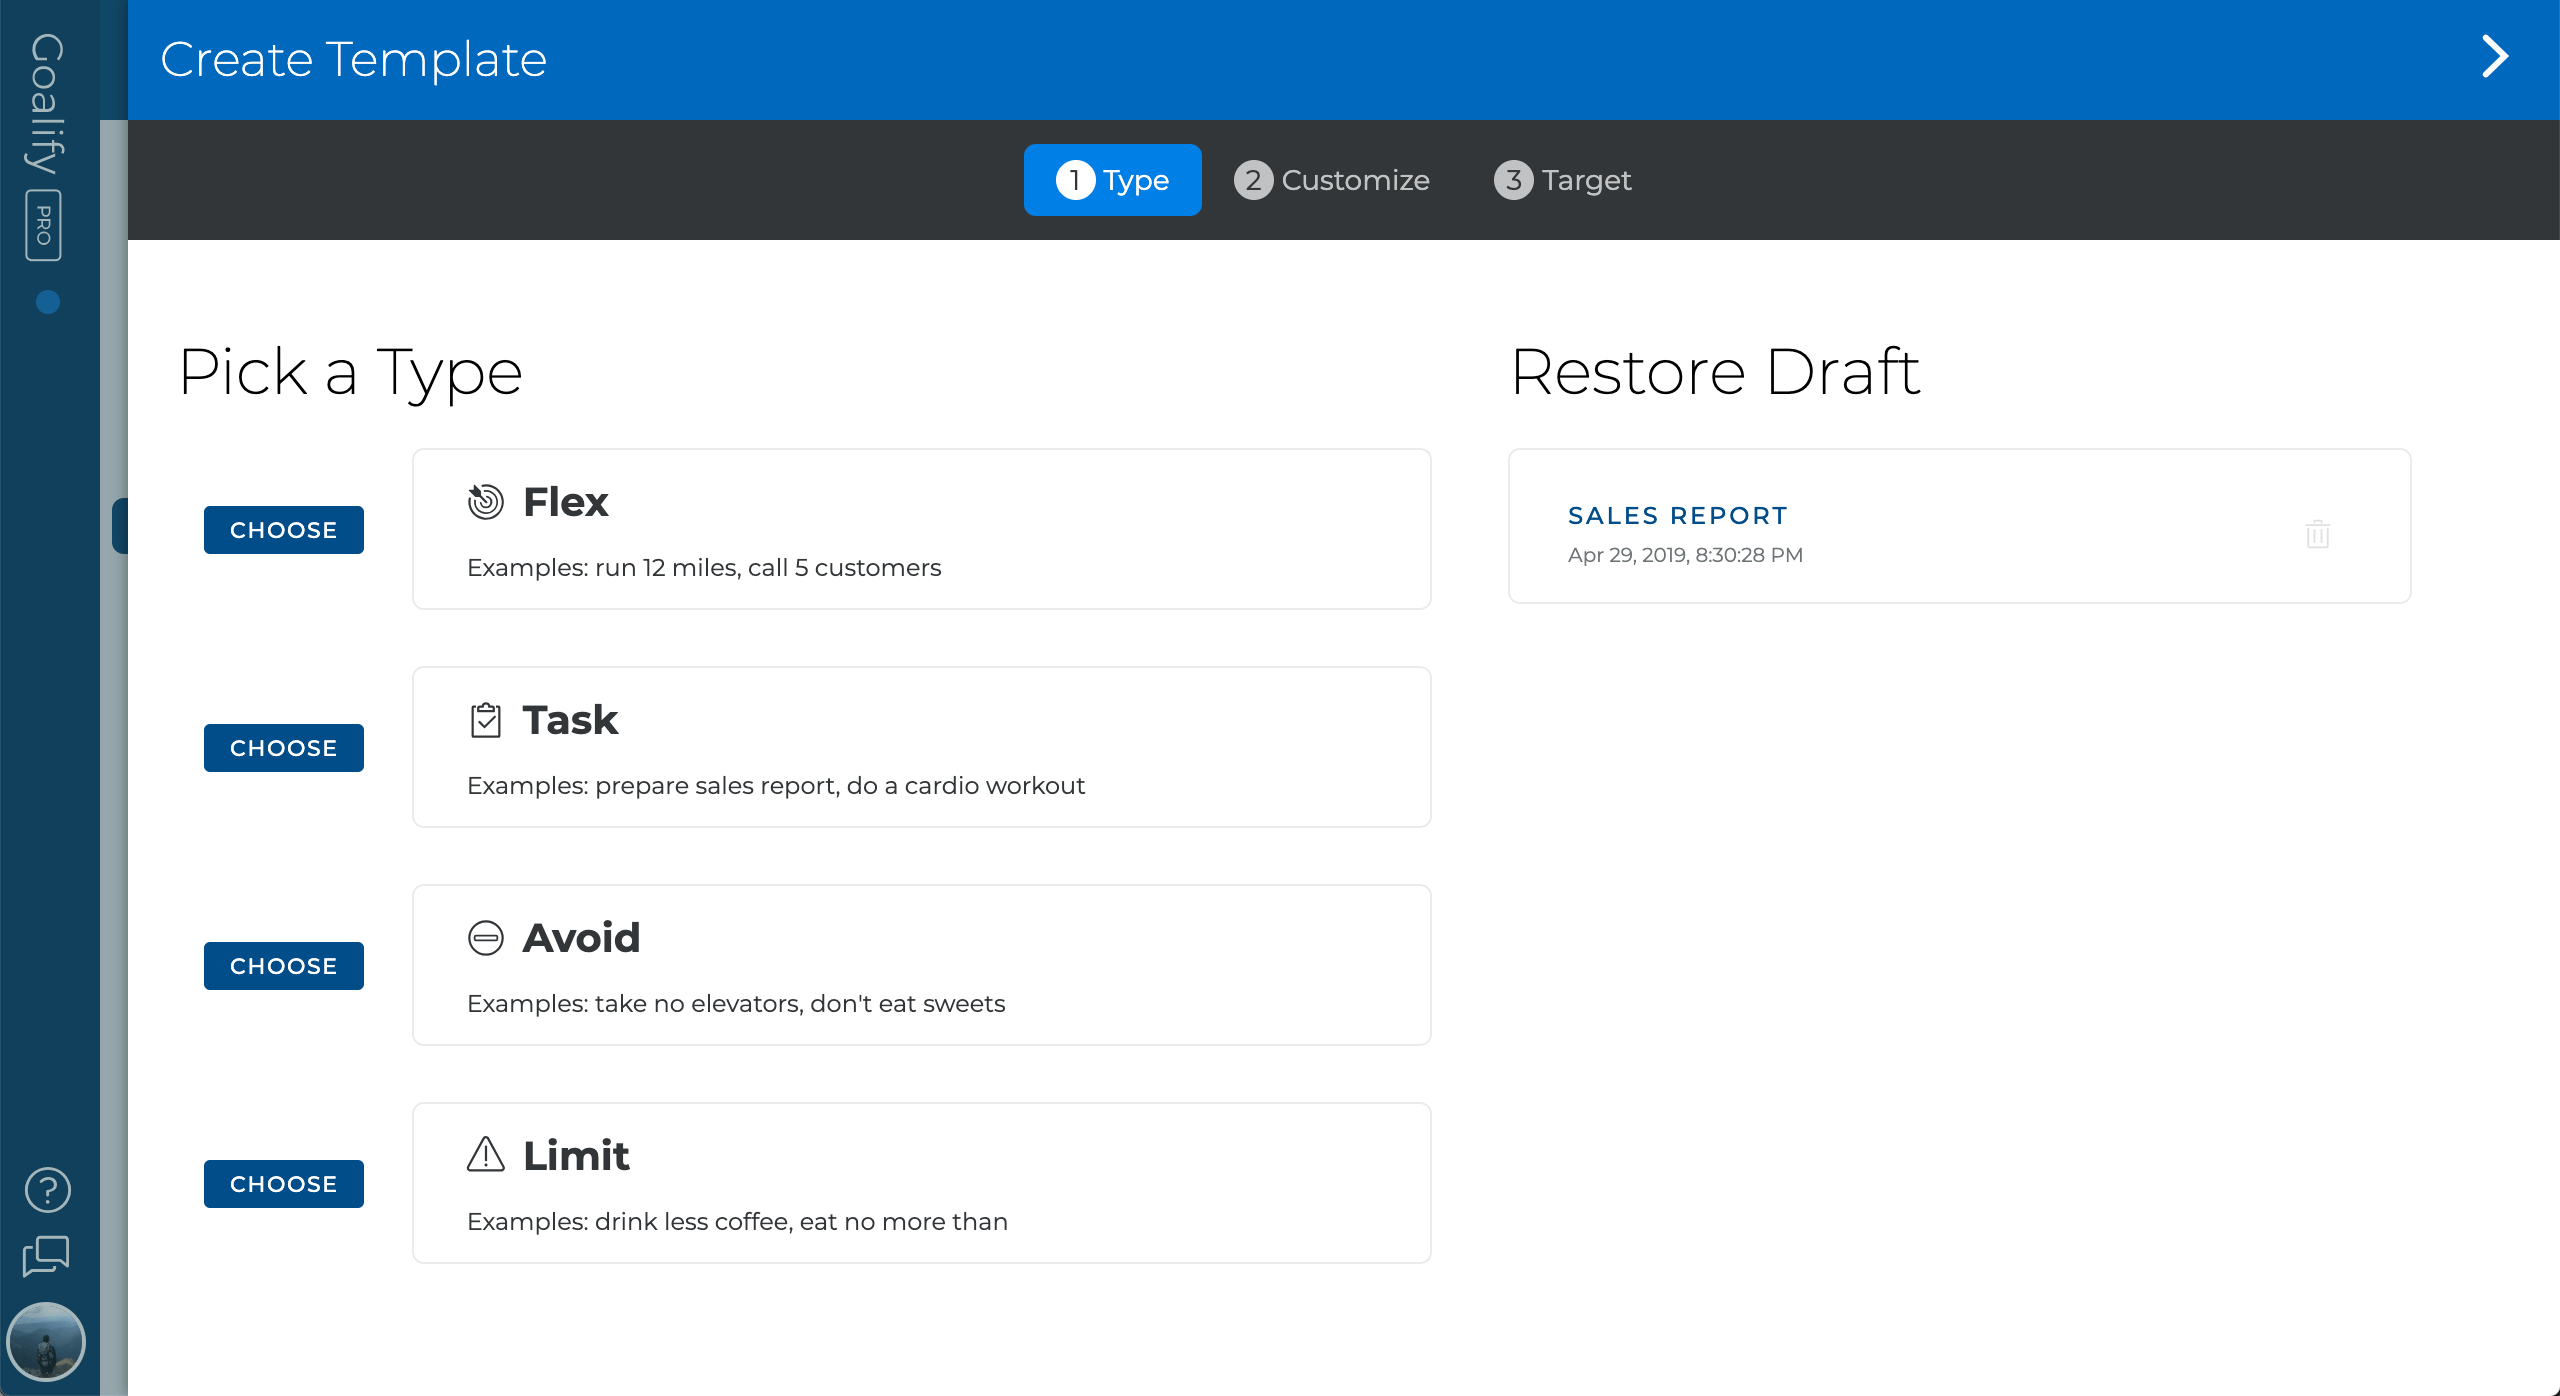
Drafts
Drafts will be automatically deleted once you save a draft as a goal or template.
Advanced Goal Setup
When you create a new goal, we have hidden some of the more advanced settings for clarity and ease of use. In some cases, it might be necessary to make adjustments to these settings. To access the advanced options set the Show Advanced Options switch to on in step two of the create goal wizard.
These are the advanced options:
- End
This is the end date of a goal. You can leave this blank and the goal will keep repeating until you set an end date or you delete it.
- Week
You can choose on which day a new week will start, i.e. on Sunday or on Monday. Try to keep this setting the same for all of a specific client's goals.
Custom Timing
By default, you can create daily, weekly and monthly goals that repeat every period or even every other period. This will be sufficient in most cases. If you do need to create goals with different timing (i.e. period length) you can choose the Custom option in the Repeats Every selection box.
This will bring up the following advanced options:
- Period Unit
Basic unit a period is based on
- Periods Days/Months
Number of periods until the goal repeats itself again
- Block Size
Number of periods that are grouped together, to build repeating blocks
- Week
You can choose on which day a new week will start, i.e. on Sunday or on Monday. Try to keep this setting the same for all of a specific client's goals.
Adjusting the above settings will let you create a variety of timing setups. Let's look at some example configurations that you might find helpful:
Repeat every two weeks
- Set Period Unit to Days
- Set Periods Days to 14
- Leave Block Size at 1
This goal will need to be reached within 14 days. After 14 days it will repeat itself.
Repeat quarterly
- Set Period Unit to Months
- Set Period Months to 3
- Leave Block Size at 1
This goal will need to be reached within a quarter (i.e. every three months). It will repeat itself every quarter. You'll probably want to align the Start date of the goal with the calendar (i.e. starting January, April, July or October).
Progressive Target
Imagine you want to create a weekly running goal, with an increasing target for four weeks and then repeat itself again.
- Set Period Unit to Days
- Set Periods Days to 7
- Set Block Size to 4
You can now set increasing targets for each of the four weeks. After the four weeks, the target will repeat with the first target again, only to increase again the next week.
Adjusting an Existing Goal
Quick Setup Tutorial
- Go to your team's Members menu
- Select your client
- Open the goal from the goal list
- Switch to the setup tab
To adjust an already existing goal for one of your clients, switch to the Members list of your team. Select the client and from the Goal list and open the goal you would like to make changes to. You open a goal by clicking on its name.
From the goal's dashboard, click the Goal Setup menu item. You can make only specific changes to the Goal Setup, but you can fully adjust a goal's targets.
Goal Setup
You can only change some properties of an already existing goal:
- Name
- Description
- End date
Goal Target
You can make changes to the current target as well as future targets. You can also create new targets for future periods.
Communicating Changes
We strongly suggest that you communicate changes to your client. If you can't do it directly for some reason, you can use our integrated chat. This will prevent confusion for your client and will improve the acceptance of the use of technology in the coaching process.
Deleting a Goal
Quick Setup Tutorial
- Go to your team's Members menu
- Select your client
- Open the goal from the Goal list
- Choose the Delete Goal option from the Actions button
- Confirm deleting the goal
To delete a client's goal, switch to the Members list of your team. Select the client, and select the goal you would like to delete from the Goal list. You open a goal by clicking on its name.
From the goal's dashboard, choose the Delete Goal option from the Actions button. You will have to confirm that you want to delete the goal, as this action cannot be reversed.
Deleting a Goal vs. Archiving a Goal
If you delete a goal, you will lose access to its data and it will no longer show up in your client's goal list. If you want to keep the goal's data, simply set an end date for the goal. When the end date has been reached, the goal will no longer show up in your client's schedule of goals.