Enrich your Coaching with Documents
Documents help you to deliver your professional expertise and to guide your clients through every step of the process. With our document feature, you can attach detailed written instructions, images or videos to the goals you create for your clients. You can even create sequences to guide your client through a series of steps. This document teaches you all about documents: how to create them, how to organize them and how you make them available for your clients.
Understanding Documents
Document is the umbrella term used to describe notes, images, files and video links that you uploaded to a team's document collection or attach to a goal or workflow. Documents can be viewed easily by your clients and provide additional insights, instructions or motivation to them.
These types of documents are currently supported:
- Text
Write or copy & paste your instructions using our text widget. You can use the various formatting options to improve how you convey your message.
- Image
You can upload one or many images from your computer. We support common file types: jpeg, png and gif. To add a picture, use the file upload option.
- Video Links
If you host your videos on Youtube or Vimeo, you can use them with Goalify Professional. Just paste the link to the video and we will handle the rest.
- Files
You can upload a wide range of file types, which clients can access and download.
- Goalify Templates
Enrich your coaching with our easy-to-customize templates. Templates include timers, countdowns, todo lists, workout lists, quotes and more.
- Web Content
You can link to external web content from within Goalify Professional. Just paste the URL to the content. Using the available variables, you can transmit certain client data to the displayed content as URL parameters.
You can also add your own HTML and CSS code using the Embedded HTML Content option. Just paste the code in the appropriate fields. This is the ideal option to embed content hosted on other platforms or to get creative with styling your content.
- Folder
Folders help you to organize all the content you have uploaded. A folder cannot be shared, only its content.
Other type of files can be uploaded and clients will be able to download them.
Hosted Content
Instructions and images that you upload as documents are hosted on our file servers. However, videos are only linked to their original origin and will not be copied and saved on our servers.
Document Library
Add content that you will use often to the team's documents library, which can be accessed by all coaches. Content from the library can easily be copied to a goal and made available to your clients, without having to recreate the content. When added to a goal the content itself is copied to the goal's own storage and becomes independent of its original source in the library. Changes made to the original file are therefore not propagated to the goal.
Quick Setup Tutorial
- Go to your team's Documents menu
- Choose the Add Document option from the Action button
- Select the type of document
- Create or upload the document
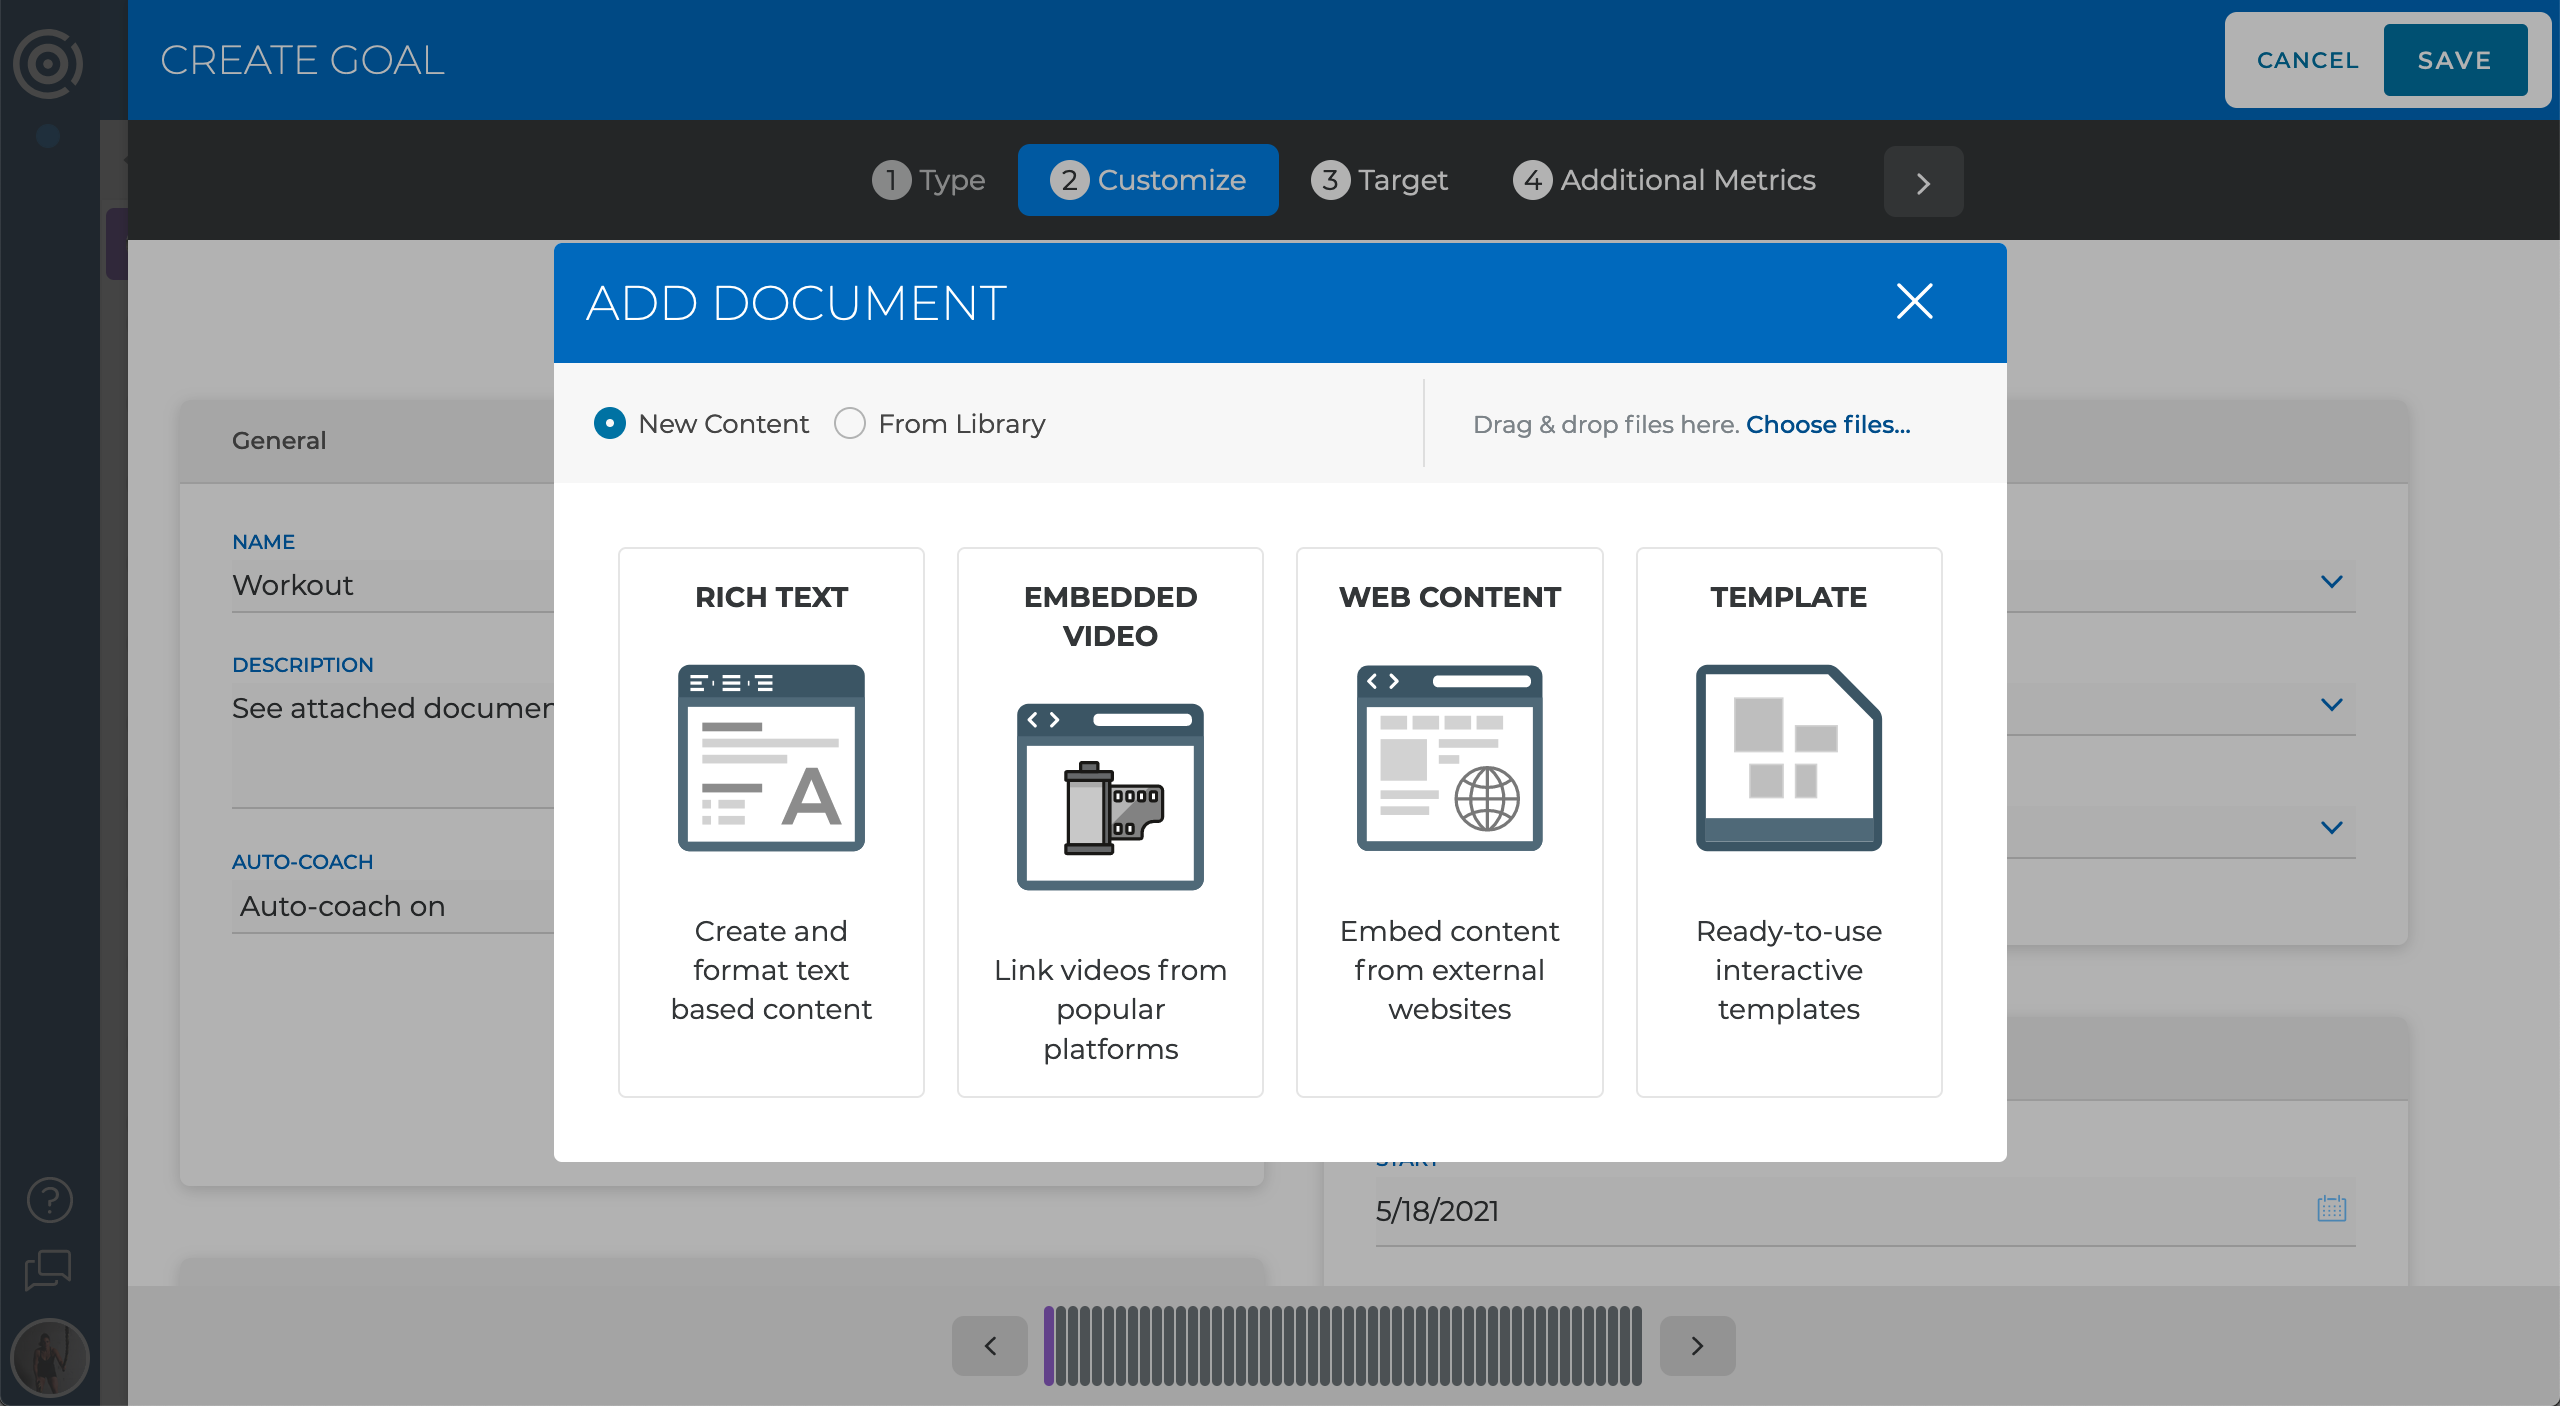
To start adding content, switch to your team's Documents library. Using the Action button on the top right of the main application window, choose the Add Document option. This will open our content widget, and you can now choose to do the following:
- Add instructions using the Text Document option.
- Enrich your coaching with our easy-to-customize templates by using the Goalify Template option.
- Add links to Youtube or Vimeo hosted videos using the Embedded Video option.
- Link to web content which will be displayed right within Goalify using the Web Content option.
Uploaded images and files will be named using the filename, but you can change the name later on, if needed. Documents will be added to the currently shown folder. Although you can move documents later on, it will be less work to select the correct folder before adding the content.
Document Access
Only content that you have attached and linked to a goal or workflow can be accessed by your clients.
Organizing Documents
Quick Setup Tutorial
- Go to your team's Documents menu
- Choose the Add Folder option from the Action button
Keeping dashboards and lists clean is one of our main priorities. To help you organize your documents and keep everything clean, we added the Folder feature. Folders in Goalify Professional work just like the folders that you are used to working with on your PC.
To add a folder, switch to your team's Documents library. Using the Action button on the top right of the main application window, choose the Add Folder option. This will add an empty folder to the currently shown folder.
Here are the most important actions when working with a folder:
- Renaming
Open the folder you would like to rename. Just click on the name in the top folder bar to make changes to it.
- Moving
You can drag & drop folders to move them around. To move a folder out of the current folder, drag & drop it on the name of the external folder (shown on the very left of the folder bar).
- Managing Content
- Adding, editing or removing documents works the same inside or outside a folder.
- Order Content
You can always rearrange the order of content items within a folder. Drag & drop the respective items to arrange them in the preferred order.
- Deleting
Click the Delete button from the top folder bar. This will delete the folder and all its contents. This action CANNOT be undone.
Assigning Documents
Add documents to a goal to provide additional insights, instructions or motivation for your clients. You can assign documents to
- a goal in general,
- to each target of a goal and
- to each step of a workflow.
You can always make changes to the documents you have attached to a goal/workflow and the following instructions, therefore, apply to new and existing goals/workflows alike.
Document Storage
Documents that you have added to a goal or workflow are stored with the goal/workflow itself. Deleting a goal or workflow, therefore, also deletes all attached documents.
Assign new Documents to a Goal
Quick Setup Tutorial
- Open the goal and switch to the Setup tab
- Click the Add Document button next to the comment or next to each defined target
- Create or upload the new content
- Click the Save button to assign the new content to the goal
When you create a new goal or adjust an existing one, you can easily add new documents to the goal itself and to each defined target. Documents you assign to the goal itself, can always be accessed by your clients. Documents that you assign to an individual target are connected to the specific target and will only be shown to clients when the target is the one that currently applies.
Take for example a weekly goal for which you assign a different document to each week of the goal's duration. Whenever your client opens the attached documents from the main dashboard he/she will see the corresponding content of that particular week. This makes documents the perfect solution to guide your client through a whole process or drip content.
Browsing Documents
Using the calendar, your clients can easily access future and past documents that have been assigned to the corresponding period of time.
You can assign up to five documents to each target or to the comment of the goal. You can change the order of the documents by dragging and dropping the content symbols.
Assign Documents from the Library to a Goal
Quick Setup Tutorial
- Open the goal and switch to the Setup tab
- Click the add document button next to the comment or next to each defined target
- Select the From Library option
- Click on the respective document to copy it to the goal/workflow and assign it to the respective place
To assign documents from your team's documents library to a specific goal/template, the document gets copied from the library to the goal itself. Open the specific goal and switch to the setup tab. Click on the add document button next to the comment or a specific target.
Click the From Library option. You can now browse all documents that are saved within the team's documents library. Click on the document that you want to use. It will be copied to the goal or workflow and assigned to the respective document slot.
Documents Library
When you copy a document from the library to a goal, the content itself is copied to the goal's own storage and becomes independent of its original source in the library. Changes made to a document in the library, therefore, do not affect copies of that document that you have already copied to a goal.
The Documents Editor
The documents editor helps you to add, manage and organize the documents of a specific goal.
Remove Documents
Quick Setup Tutorial
- Open the goal and switch to the Setup tab
- Click on the document to open it
- Choose the Delete option from the Actions button.
- Save the changes by using the goal's Save button.
When you need to remove a document from a goal, open the specific goal and switch to the setup tab. Click on the document icon next to the comment or a specific target to open it. Select the Delete option from the Actions button.
All currently assigned documents are automatically selected. Deselect the document you would like to remove from the goal's comment or specific target. Click the Assign Docs button to apply the changes. Make sure to click the Save button of the goal to save all changes and apply it to your client's copy.